Budget-Friendly DIY Hydroponic Systems You Can Build Today
Hydroponics doesn't have to be expensive or complicated. Building your own DIY hydroponic system is a fantastic way to learn the basics and save money.
Hydroponics doesn't have to be expensive or complicated. In fact, building your own DIY hydroponic system is a fantastic way to learn the basics, save money, and customize your setup to fit your needs. In this article, I'll walk you through some simple, cost-effective systems you can create with minimal tools and materials.
1. The Kratky Method (Simplest System)
What It Is A passive, non-circulating deep water culture system. No pumps, no electricity—just a container, nutrient solution, and plants.
Materials Needed - Container with lid (5-gallon bucket, storage tote) - Net pots (2-3 inch) - Growing medium (clay pebbles, perlite) - Hydroponic nutrients - pH test kit
Cost: $15-30
How to Build 1. Cut holes in lid sized for net pots 2. Paint container black or cover to block light 3. Fill with nutrient solution to just touch net pot bottom 4. Place seedlings in net pots with growing medium 5. Leave air gap as roots grow
Best For - Lettuce and leafy greens - Herbs - Beginners learning the basics - Situations without electricity
2. Simple DWC (Deep Water Culture)
What It Is Plants suspended over aerated nutrient solution. Roots grow directly in the water.
Materials Needed - 5-gallon bucket with lid - Air pump (aquarium type) - Air stone - Airline tubing - Net pots - Growing medium
Cost: $25-50
How to Build 1. Drill hole in bucket lid for net pot 2. Drill small hole for airline tubing 3. Place airstone at bottom of bucket 4. Connect airline to air pump 5. Fill with nutrient solution 6. Insert plant in net pot
Best For - Single large plants - Tomatoes, peppers, cucumbers - Learning active hydroponics
3. Floating Raft System
What It Is Plants float on a raft in a shallow nutrient reservoir. Great for multiple small plants.
Materials Needed - Shallow container or storage tote - Styrofoam sheet (1-2 inch thick) - Net pots or cups with holes - Air pump and airstone - Growing medium
Cost: $30-60
How to Build 1. Set up container with nutrient solution 2. Add aeration (airstone connected to pump) 3. Cut holes in styrofoam for net pots 4. Float raft on solution 5. Insert plants
Best For - Lettuce, herbs, leafy greens - Classroom demonstrations - Multiple plants, same nutrient needs
4. Simple Wick System
What It Is The most basic passive system. Nutrients are drawn up through wicks to the plant roots.
Materials Needed - Two containers (one with reservoir, one with plants) - Fabric wicks (cotton rope, felt strips) - Growing medium (perlite works best) - Net pots
Cost: $10-20
How to Build 1. Cut holes in upper container bottom for wicks 2. Thread wicks through holes into reservoir below 3. Fill upper container with growing medium 4. Plant seedlings 5. Fill lower container with nutrient solution
Best For - Small herbs - Very simple introduction to hydroponics - Low-maintenance setups
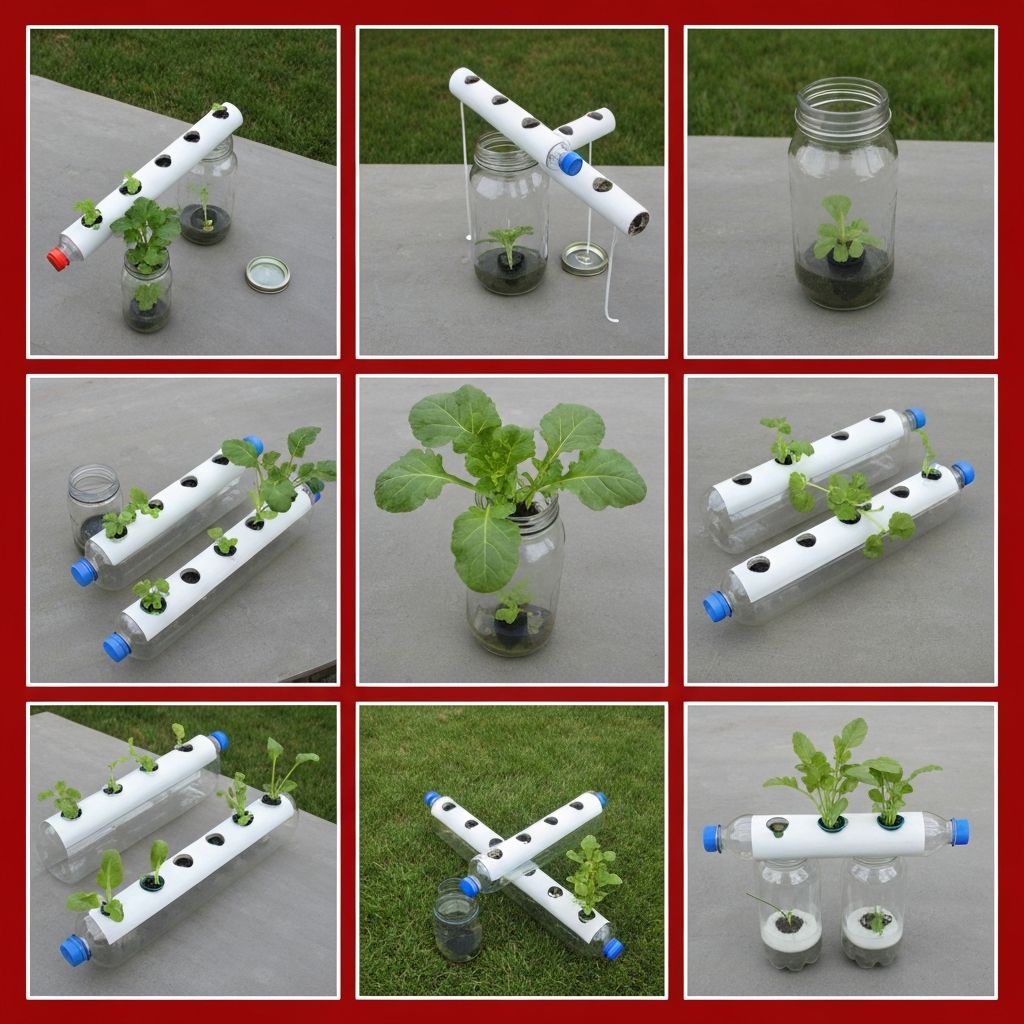
5. PVC Pipe NFT System
What It Is A nutrient film flows over plant roots in channels. More advanced but very efficient.
Materials Needed - PVC pipes (3-4 inch diameter) - End caps - Small water pump - Reservoir (tote or bucket) - Tubing - Net pots
Cost: $50-100
How to Build 1. Cut holes in PVC for net pots 2. Install end caps, one with drain hole 3. Connect pipes at slight angle (1-2%) 4. Set up pump to deliver solution to high end 5. Return flow drains to reservoir 6. Plant seedlings
Best For - Leafy greens and herbs - Multiple plants - More experienced DIYers
Essential Supplies for Any DIY System
Must-Haves - pH test kit ($10-20) - Hydroponic nutrients ($15-30) - Net pots ($5-10 for a pack) - Growing medium ($10-20)
Nice to Have - EC/PPM meter ($20-40) - pH up/down solutions ($10-15) - Timer for pumps ($10-20)
Tips for DIY Success
Start Simple Choose the Kratky or wick method for your first system. Master the basics before adding complexity.
Use Food-Safe Materials Avoid containers that may leach chemicals. Food-grade buckets and totes are safest.
Light-Proof Your Reservoir Algae grows when light reaches nutrients. Paint containers or cover with tape.
Plan for Maintenance Ensure you can easily access the reservoir for top-ups and changes.
Document Everything Keep notes on what you build and how it performs.
Common DIY Mistakes
- - **Inadequate aeration:** More air is almost always better
- - **Poor light blocking:** Leads to algae problems
- - **Wrong container material:** Can contaminate nutrients
- - **Over-engineering:** Start simple, add complexity later
- - **Skipping pH management:** Essential even for DIY systems
Upgrading Your DIY System
Once you've mastered basics, consider: - Adding a timer for consistency - Upgrading to a real EC meter - Building a larger system - Adding environmental monitoring - Automating nutrient dosing
DIY hydroponics is rewarding, educational, and budget-friendly. Your homemade system can produce just as well as expensive commercial setups!
Related Articles
Introduction to Hydroponics: A Beginner's Guide
Have you ever wished you could grow fresh veggies or herbs right in your own home but felt intimidated by the idea of traditional gardening? Hydroponics might be exactly what you're looking for.
Read moreGetting Started10 Compelling Reasons to Try Hydroponic Gardening
If you've ever wondered whether hydroponic gardening is worth trying, let me share 10 compelling reasons why it's one of the best decisions you can make as a beginner gardener.
Read moreGetting Started5 Common Myths About Hydroponic Gardening Debunked
Hydroponic gardening is gaining popularity as an innovative, sustainable way to grow plants without soil. However, like many modern methods, it's surrounded by misconceptions.
Read moreReady to Start Growing?
Check out our product reviews to find the perfect hydroponic system for your needs.
View Product Reviews